Quick Start
To get started with doctest, install doctest using kmpkg:
kmpkg install doctest
You can also download the latest version (it’s just a single header file) and include it in your source files (or add this repository as a git submodule).
This tutorial assumes you can use the header directly: #include "doctest.h" – so it is either in the same folder as your test source files, or you have correctly set up its include path in your build system.
TDD is not discussed in this tutorial.
A Simple Example
Suppose we have a factorial() function to test:
int factorial(int number) {
    return number <= 1 ? number : factorial(number - 1) * number;
}
A complete compilable example with self-registering tests looks like this:
#define DOCTEST_CONFIG_IMPLEMENT_WITH_MAIN
#include "doctest.h"

int factorial(int number) { return number <= 1 ? number : factorial(number - 1) * number; }

TEST_CASE("testing the factorial function") {
    CHECK(factorial(1) == 1);
    CHECK(factorial(2) == 2);
    CHECK(factorial(3) == 6);
    CHECK(factorial(10) == 3628800);
}
This compiles into a full executable that responds to command-line arguments. If you run it without any arguments, it will execute all test cases (in this case – only one), report any failures, output a summary of the number of passed and failed tests, and return 0 on success, 1 if failed (useful if you just want a yes/no answer: does it work).
If you run it as written, it will pass. All good. Right? Well, there’s still a bug here. We missed checking if factorial(0) == 1, so let’s add that check too:
TEST_CASE("testing the factorial function") {
    CHECK(factorial(0) == 1);
    CHECK(factorial(1) == 1);
    CHECK(factorial(2) == 2);
    CHECK(factorial(3) == 6);
    CHECK(factorial(10) == 3628800);
}
Now we get a failure – something like:
test.cpp(7) FAILED!
  CHECK( factorial(0) == 1 )
with expansion:
  CHECK( 0 == 1 )
Note that we get the actual return value (0) of factorial(0) printed for us – even though we used a natural expression with the == operator. This lets us see the problem immediately.
Let’s change the factorial function to:
int factorial(int number) { return number > 1 ? factorial(number - 1) * number : 1; }
Now all tests pass.
Of course, there are more issues to handle. For example, we’ll run into problems when the return value starts to exceed the range of int. For factorial, this can happen quite quickly. You may want to add tests for such cases and decide how to handle them. We won’t do that here.
What Did We Do Here?
Although this is a simple test, it’s enough to demonstrate a few key points about using doctest.
-
All we did was
#definean identifier and#includea header, and we got everything – even amain()implementation that responds to command-line arguments. For (hopefully) obvious reasons, you can only use this#definein one source file. Once you have multiple files containing unit tests, you just#include "doctest.h". Typically, it’s best to have a dedicated implementation file containing nothing but#define DOCTEST_CONFIG_IMPLEMENT_WITH_MAINand#include "doctest.h". You can also provide your ownmainfunction and drive the doctest implementation yourself – see Providing your ownmain(). -
We introduced a test case with the
TEST_CASEmacro. It takes one parameter – a free-form test name (see Test Cases and Subcases for more details). Test names do not have to be unique. You can run a set of tests by specifying wildcard test names or tag expressions. See the Command Line documentation for more information on running tests. -
The name is just a string. We didn’t have to declare a function or method – or explicitly register the test case anywhere. Behind the scenes, the system defines a function with a generated name for you and automatically registers it using a static registry class. By abstracting away the function name, we can name our tests without being limited by identifier naming rules.
-
We wrote individual test assertions using the
CHECK()macro. We expressed the condition naturally using standard C++ syntax, rather than using separate macros for each type of condition (equals, less than, greater than, etc.). Behind the scenes, a simple expression template captures the left and right sides of the expression, allowing us to display their values in the test report. Other Assertion Macros are not covered in this tutorial – but their number is greatly reduced thanks to this technique.
Test Cases and Subcases
Most test frameworks have class-based fixture mechanisms – test cases map to methods on a class, and setup/teardown logic can be placed in setup() and teardown() methods (or constructors/destructors in languages like C++ that support deterministic destruction).
While doctest fully supports this approach, it has some drawbacks. In particular, the way code must be split and its inflexible granularity can cause issues. You only get one setup/teardown pair for a set of methods, but sometimes you want slightly different setup for each method, or you may even need multiple levels of setup (we’ll clarify this concept later in the tutorial). It was problems like this that led James Newkirk (who led the team that built NUnit) to start building xUnit from scratch.
doctest takes a different approach (compared to both NUnit and xUnit) that fits more naturally with C++ and the C family of languages.
This is best explained with an example:
TEST_CASE("vectors can be sized and resized") {
    std::vector<int> v(5);

    REQUIRE(v.size() == 5);
    REQUIRE(v.capacity() >= 5);

    SUBCASE("adding to the vector increases its size") {
        v.push_back(1);

        CHECK(v.size() == 6);
        CHECK(v.capacity() >= 6);
    }
    SUBCASE("reserving increases just the capacity") {
        v.reserve(6);

        CHECK(v.size() == 5);
        CHECK(v.capacity() >= 6);
    }
}
For each SUBCASE(), the TEST_CASE() is executed from the start – so when we enter each subcase, we know the size is 5 and the capacity is at least 5. We enforce these requirements at the top level with the REQUIRE() macro, so we can be confident in them. If a CHECK() fails – the test is marked as failed but execution continues – but if a REQUIRE() fails – test execution stops immediately.
This works because the SUBCASE() macro contains an if statement that calls back into doctest to check if the subcase should be executed. One leaf case is executed each time the TEST_CASE() runs. Other subcases are skipped. On the next run, the next subcase is executed, and so on until no new subcases are left.
So far so good – this is already an improvement over setup/teardown methods because our setup code is now inline and uses the stack. The real power of subcases becomes evident when we start nesting them, as in the following example:
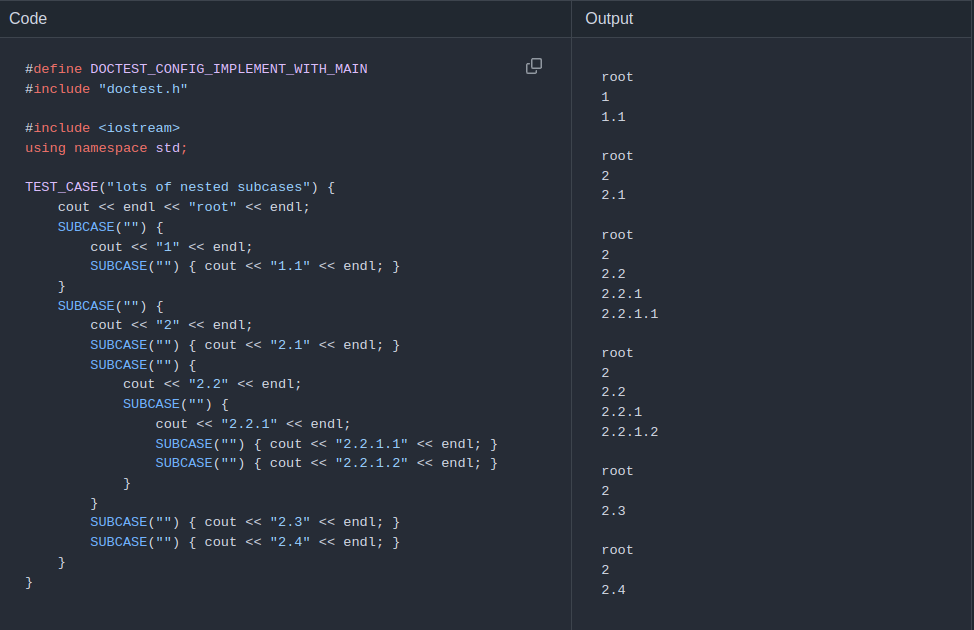
Subcases can be nested to any depth (limited only by stack size). Each leaf case (a subcase with no nested subcases) is executed exactly once on a unique execution path (so no leaf case interferes with another). A fatal failure in a parent subcase will prevent nested subcases from running – but that’s intentional.
Remember that even though doctest is thread-safe – subcases can only be used in the main test runner thread. Threads spawned in any subcase should be joined before the subcase ends, and new subcases should not be entered while other threads containing doctest assertions are still running.
Scaling Up
To keep the tutorial simple, we put all the code in one file. This is fine for getting started – and makes it quicker and easier to start using doctest. However, this isn’t the best approach when you start writing more realistic tests.
The requirement is that the following code block (or equivalent):
#define DOCTEST_CONFIG_IMPLEMENT_WITH_MAIN
#include "doctest.h"
appears exactly once in one translation unit (source file). You can use as many additional source files as needed for your tests – partition them in a way that makes the most sense for your workflow. Each additional file only needs to #include "doctest.h" – do not repeat the #define! In fact, it’s often a good idea to put the block with the #define into its own dedicated source file.
Next Steps
This has been a brief introduction to get you up and running with doctest, and to highlight some key differences between doctest and other frameworks you may be familiar with. This will take you a long way already – now you can dive in and start writing tests.
Of course, there’s much more to learn – see the growing Reference section to explore all available features.