Tutorial: Install native dependencies in a CLR application
C++/CLI is a technology that lets you combine .NET classes with native C++ types to create libraries and applications that take C++ code and make it accessible to .NET programs.
You can use kmpkg in combination with C++/CLI to install and consume C++ dependencies in your projects targetting the Common Language Runtime (CLR).
In this tutorial, you will learn how to:
- [Build a sample C++/CLI project](#build-a-sample c++-cli)
- Add a C++ native dependency
- Build the application
Prerequisites
- kmpkg
- Git
- Developer Powershell for Visual Studio
- Visual Studio with the
following components:
- C++ development workload
- C++/CLI support component
Build a sample C++/CLI
In this tutorial, we will start from an existing C++/CLI application and add a C++ dependeny installed with kmpkg. The commands in this tutorial assume that you're running them in a Developer PowerShell for Visual Studio.
1 - Clone the sample repository
The first step is to get a copy of the C++/CLI sample application in the .NET
samples repository. The C++/CLI sample
application is located in the core/interop/cpp-cli folder.
git clone https://github.com/dotnet/samples
2 - Navigate to the sample application folder
cd samples/core/interpo/cpp-cli
2 - Check that the project builds and runs correctly
The sample repository contains a solution with four projects:
- ManagedLibrary: A C# library for .NET
- MixedLibrary: A library mixing native C++ code and .NET code from ManagedLibrary
- NativeApp: A C++ application that consumes .NET code from MixedLibrary
- ManagedApp: A C# application that consumes C++ code from MixedLibrary
Run the following command to build the solution's projects:
msbuild CPP-CLI.sln -restore
If the build fails make sure that you have installed the required components for Visual Studio listed in the Prerequisites section, and that you meet the minimum requirements of .NET 5.0 SDK or later and Visual Studio 2019 16.8 or later] of the sample application.
Once built, you can run ManagedApp.exe
./bin/Debug/x64/ManagedApp.exe
The program produces the following output:
=== Managed class ===
Hello from ManagedClass in MixedLibrary
Hello from NativeClass in MixedLibrary
-- message: from managed app!

=== P/Invoke ===
Hello from NativeEntryPoint_CallNative in MixedLibrary
Hello from NativeClass in MixedLibrary
-- message: from managed app!
3 - Open the project in Visual Studio
In the next steps we will modify the library to use fmt to print messages to
the console. The fmt library will be installed via kmpkg and linked in the
consuming projects.
To edit the source files, open the CPP-CLI.sln solution in Visual Studio:
start CPP-CLI.sln
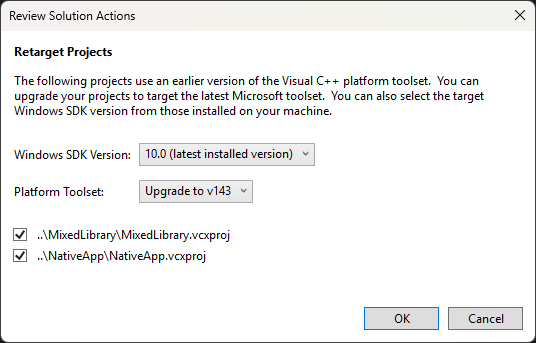
Once the solution has been opened in Visual Studio you may get a prompt to retarget the project to the latest versions. You can click OK to upgrade the Windows SDK Version and Platform Toolset to latest.
Add a C++ native dependency
Next, we will be making the following changes to the MixedLibrary project.
- Add a kmpkg manifest to acquire
fmt. - Enable kmpkg in the project.
- Modify the
NativeClass::Helloto usefmtto print messages.
1 - Create a kmpkg manifest
Right-click on the NativeLibrary project and click on Add > New Item in the context menu.
Name the new item kmpkg.json, this is the kmpkg manifest file, and make sure
that the file is created in the root of the project's folder.
2 - Add fmt as a depedency
Open the kmpkg.json file and edit its content to match the following:
{
  "dependencies": [ "fmt" ]
}
If the kmpkg manifest file is located in the right location and you try to build the project, you will get the following warning:
The kmpkg manifest was disabled, but we found a manifest file in samples\core\interop\cpp-cli\MixedLibrary\. You may want to enable kmpkg manifests in your properties page or pass /p:KmpkgEnableManifest=true to the msbuild invocation.
3 - Enable kmpkg in MixedLibrary's properties
Open the MixedLibrary's properties page by right-clicking on the project and clicking the Properties option.
Change the following properties in the kmpkg section:
- Use Kmpkg set to Yes
- Use Kmpkg Manifest set to Yes
- Instal Kmpkg Dependencies set to Yes
- Use AutoLink set to Yes
- App-locally deploy DLLs set to Yes
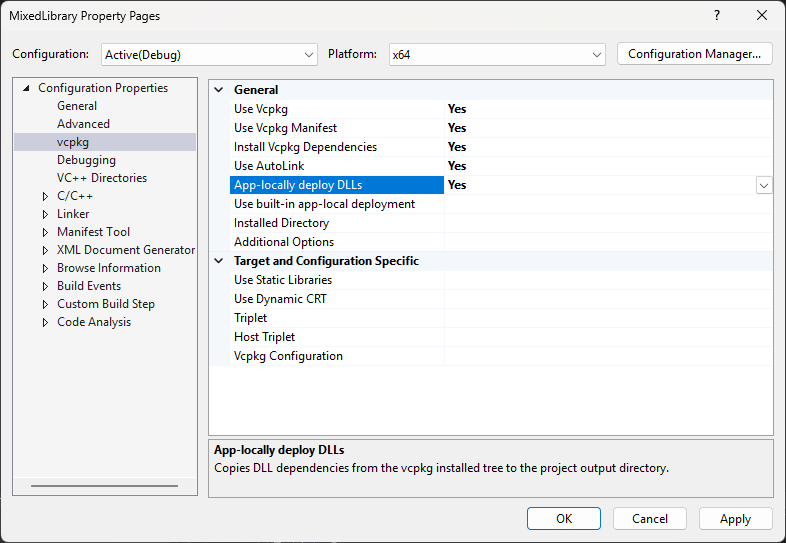
With these changes Visual Studio will now read the kmpkg.json file and
automatcally install the dependencies contained in the manifest before building
the project.
While in the Properties page, we also want to enable the /utf-8 flag to make
fmt build correctly.
In the Command Line subsection of the C/C++ settings edit the Additional Options
to include /utf-8 in the
Finally, click OK to close the Properties page.
4 - Verify kmpkg is working
If everything is correctly configured, Visual Studio will invoke kmpkg to install your dependencies before building the MixedLibrary project.
1>Installing kmpkg dependencies to  C:\path\to\samples\core\interop\cpp-cli\MixedLibrary\kmpkg_installed\x64-windows\
1>"C:\path\to\kmpkg\kmpkg.exe" install --x-wait-for-lock --triplet "x64-windows" --kmpkg-root "C:\path\to\kmpkg\" "--x-manifest-root=C:\path\to\samples\core\interop\cpp-cli\MixedLibrary\" "--x-install-root=C:\path\to\samples\core\interop\cpp-cli\MixedLibrary\kmpkg_installed\x64-windows\"
If you don't see kmpkg output, or if fmt fails to build, make sure that you
followed the steps above correctly, including adding /utf-8 in the Additional
Options in C/C++ > Command Line.
4 - Modify the project's source code
Finally, we want to modify the MixedLibrary.cpp file to use fmt to print
messages to the console. Make the following changes to the source code:
1 - Include the fmt/printf.h header (on line 5).
#include <iostream>
#include <vcclr.h>
#include <fmt/printf.h>
2 - Modify the NativeClass::Hello function to use fmt::println (on line 44).
void MixedLibrary::NativeClass::Hello(const wchar_t *msg)
{
    auto ws = std::wstring(msg);
    auto str = std::string(ws.length(), 0);
    std::transform(ws.begin(), ws.end(), std::back_inserter(str), [](wchar_t c) { return static_cast<char>(c); });
    fmt::println("Hello from NativeClass in MixedLibrary");
    fmt::println("-- message: {}", str);
    fmt::println("-- printed using FMT version {}", FMT_VERSION);
}
Build the application
The NativeClass::Hello function is used in the ManagedApp project to print a
message to the console using C++ code. The changes above make it so that the
fmt library is consumed in the CLR application.
No changs to the application's project are needed, just build and run the ManagedApp project.
The output of the program should look similar to this:
=== Managed class ===
Hello from ManagedClass in MixedLibrary
Hello from NativeClass in MixedLibrary
-- message: from managed app!
-- printed using FMT version 110002

=== P/Invoke ===
Hello from NativeEntryPoint_CallNative in MixedLibrary
Hello from NativeClass in MixedLibrary
-- message: from managed app!
-- printed using FMT version 110002
Next steps
Also learn about other useful features: